
Over the past year, I have been closely following CodeQL, a static code analysis tool built by Semmle founded in the UK back in 2006. Recently Semmle was acquired by GitHub back in September 2019 and is joining the GitHub Security portfolio of tools. Several things got me very interested recently about the tool and why I’m writing this blog article.
Here are some of those:
- It is/will be free for open-source projects (big win for open-source)
- You can run the analysis locally for research or testing of open-source projects
- You can write custom rules/queries for the engine (CodeQL)
- The queries themselves are open-source, and anyone can contribute (unlike other vendors)
Hopefully, from this article, you can learn how to get started with CodeQL, setup the environment, and analysing projects for research along with writing custom queries for your open source projects.
What is the CodeQL Engine, Database, and Queries?
The Static Application Security Testing (SAST) tool is built out of multiple core components that we’ll need to understand their role and purpose. There are three main components we’ll be covering in this blog.
- The Engine
- The Database
- The Queries
The Engine
Lets first of all, start with the engine, CodeQL, which is the core component that performs the core functionality. This includes everything from the lexical analysis lexing/tokenizing of the code, generating an Abstract Syntax Tree (AST), and generating the Control-Flow Graphs (CFG) & Data Flow Graphs (DFG).
This allows us to take any codebase which the engine supports, run the CodeQL engine on that code-base and create a CodeQL Database which is the next core component that we’ll cover.
The Database
During the parsing stage, CodeQL creates and stored all of the required data about the code which it needs to have for the analysis in a Database. This generates a large amount of data and facts about your codebase that can be used to query and identify items and flows in the code, such as security vulnerabilities.
Both the Engine and Database workery closely together in the form of the CLI (which we’ll cover later on in this post).
The Queries
The Queries or QL (Query Language) are where developers or (security) researchers define what parts of the code they want to identify (Sources and Sinks) and create configurations for data flows to return the specified flows in an application they are looking for. CodeQL Queries are, at there core, a way of querying data from a CodeQL Database to return a set of result.
The language is both a Structured Query Language (SQL) and an Object-Oriented Programming (OOP) programming language. Your code can have Classes, Function/Predicate declarations, importing of other queries, inheritance, and overriding features but can also have a SQL-like queries pattern to select the content you want to return.
Queries can be very complex using methods to perform specific tasks, importing of other queries for modularity for commonly used code, and condition statements to exclude or include as per your particular requirements.
In this blog post, I will not be covering in-depth on how to write CodeQL Queries, but if you want to learn more, please check out the following references:
- Semmel’s CodeQL Docs
- Finding security vulnerabilities in Java with CodeQL - GitHub Satellite 2020
- Finding security vulnerabilities in JavaScript with CodeQL - GitHub Satellite 2020
I will also be creating a post on this topic soon, so keep tuned.
Initial Setup
Before we start scanning any code, we need to start by setting up an environment where we can use analysis code correctly. This involves three core steps; setting up the CLI, Query Packs, and an application to scan.
I’ll also touch on the Visual Studio Code plugin a little, but we shall not be using it for this post.
Setting up CodeQL CLI
To setup CodeQL as a command-line utility, you with need to do a few different things. The first step to make everything a little easier is to create a folder on your machine to contain the binaries, queries and other CodeQL related files. The CLI works on Unix and Windows machines.
Now we need to download the CLI tool from Github releases.
This repository doesn’t contain any source code for the CLI, but it does have the necessary binaries to run CodeQL.
Once downloaded, we need to extract the codeql folder into our CodeQL root folder.
I recommend calling the extracted folder something along the lines of “codeql-cli” or “codeql-binaries” to make it easy to recognise it.
You may want to add CodeQL to your shell’s path.
This can be done on Linux export PATH=/path/to/codeql:$PATH and on Windows this can be done by going to “Edit the system environment variables” and add it to either user or system-wide paths.
You may need to reload your shell.
Building Query Packs and Suites
The next step is to download CodeQL’s Query Packs (which are independent of the engine). A Query (QL) Pack is a collection of queries, library files, query suites, and essential metadata use for the analysis.
There are two main packs we need for any analysis.
The first pack is for Java, JavaScript, C/C++, C#, and Python, which can be found here.
For GoLang support, you’ll need to use the codeql-go-repo found here.
You can clone/download these from their GitHub repositories using the following. I primarily use the latest tagged version to minimise issues with the current main branch.
# Clone the codeql repo
git clone -b v1.24.0 --depth=1 https://github.com/github/codeql.git queries

git clone -b v1.24.0 --depth=1 https://github.com/github/codeql-go.git queries-go
Once you have both the CLI installed and the queries for the languages in the CodeQL folder, you’ll want to make sure everything is set up correctly by resolving both the current supported languages and query packs.
The first command will list all of the CodeQL extractor packs available on the system. You should have seven or more different languages all pointing to folders in the CLI folder.
codeql resolve languages

# ----- output ----- #
# cpp (C:\CodeQL\codeql-cli\cpp)
# csharp (C:\CodeQL\codeql-cli\csharp)
# go (C:\CodeQL\codeql-cli\go)
# java (C:\CodeQL\codeql-cli\java)
# javascript (C:\CodeQL\codeql-cli\javascript)
# python (C:\CodeQL\codeql-cli\python)
# xml (C:\CodeQL\codeql-cli\xml)
The second command will create a list of all the installed QL packs discovered on the system. You’ll have multiple folders pointing to the core language pack along with tests, upgrades, and examples packs. If you have added GoLang support, you need to make sure it is present in the list and pointing to the correct folder.
codeql resolve qlpacks

# ----- output ----- #
# ...
# codeql-go (C:\CodeQL\codeql-custom\queries-go\ql\src)
# codeql-java (C:\CodeQL\codeql-custom\queries\java\ql\src)
# codeql-javascript (C:\CodeQL\codeql-custom\queries\javascript\ql\src)
# codeql-python (C:\CodeQL\codeql-custom\queries\python\ql\src)
# ...
Query Suites
Now that we have all the public queries we will need to do the analysis of the code we can use an existing or create our own collection of queries we want to run called Query Suites. If you’re going to develop your Query Suite, follow this guide. We will be using the built-in one that is inside the javascript query pack.
Selecting the Application
The last thing we need to do is get a code-base which we want to analysis. I have picked DevSlop’s Pixi project, which is an open-source JavaScript (NodeJS and Angular) application which has been built intensionally with vulnerabilities. Of course, you can select any project you want to do this.
# Clone the project
cd ./apps
git clone --depth=1 https://github.com/DevSlop/Pixi.git Pixi
Alternative: VSCode Plugin
A great addition you can also use is the Visual Studio Code plugin from the GitHub CodeQL Team. This extension can be used to load up Query Packs which you can run on a selected database you have created or downloaded from LGTM. Along with the plugin, you can clone/download the VSCode CodeQL Workspace which massively helps organise your project.
The is a great alternative to quickly installing all the required query sources and no need to use commands to run the CLI tool.
Generating the CodeQL Database
Now we have finished our environment setup and configuration, we can move on to generating a CodeQL Database for our project. This phase is simple in most cases but can take time to parse the code (depending on the size of the code-base).
For all compiled languages you will need to supply the build commands to compile the code. If not, the analysis with fail and you will not be able to generate the database to run your queries against. Let’s take the project that we will be analysing and run the CLI tool to create the CodeQL Database.
Below you can see two codeql commands:
The first is to analysis the Pixi project (JavaScript, interpreted).
The second is an example where you’re analysing Java (compiled) code from OWASP WebGoat project, but we won’t be focusing on this code-base in this article.
# Create database folder
mkdir databases

# Create CodeQL database for JavaScript (interpreted language)
codeql database create \
  ./databases/Pixi \
  --language="javascript" \
  --source-root="./apps/Pixi"

# Another example using Java (compiled language)
codeql database create \
  ./databases/WebGoat \
  --language="java" \
  --command="mvn clean install --file pom.xml" \
  --source-root="./apps/WebGoat"
You can run codeql database create --help to get a full list of commands and details of each argument but here is a short summary for each one.
./databases/Pixi[database path] (required)
The first argument is the location of where the CodeQL Database is stored.
--language(required)
This specifies the languages you want to analysis in your repository. When you don’t select anything, all supported languages will be analysed and added to the database.
--command(compiled languages only)
This specifies the command that the tool will need to compile the code you are analysing. Note that the compiling tools (make, mvn, etc.) need to be installed on the machine you are running this on.
--source-root(default is current directory)
This argument points to the source code you want to analysis.
Database Creation Output
Now let us take a look at an example output of the command looks like (ran in PowerShell):

You will notice in the logs all the files that are being analysed by the CodeQL engine and the resulted of the analysis placed into the CodeQL Database. Once the command has finished analysing the code, a folder structure is created hosting a multitude of files containing information about the code-base. This Database is now ready for us to run queries against it.
Running Queries and Analysing the Results
Now we have our a Database (either from generating one or downloading one) we can move on to the fun bit; running queries.
We have a collection of security queries ready for us built by the GitHub CodeQL team which have provided them as part of the codeql repository (we cloned them earlier).
Note: Sometimes you might be required to update the database before running the upgrade command
# Create a results folder
mkdir results
# [optional] Might be required to update the database
codeql database upgrade ./databases/Pixi

# Analysis the project using a Reflective Cross-Side Scripting
codeql database analyze \
  --ram=8000 --threads=4 \
  --format="csv" \
  --output="./results/xss-reflected.csv" \
  ./databases/Pixi \
  ./queries/javascript/ql/src/Security/CWE-079/ReflectedXss.ql
You can run codeql database analyze --help to get a full list of commands and details of each argument but here is a short summary for each one.
--ram=8000&--threads=4
These two options are used to select the amount of RAM and execution threads you want to use for the process.
--format(required)
The format argument tells the CodeQL to what format do you want to export the data generated by the engine too.
The two main formats are csv (easy to read) and SARIF, more about that in a minute.
--output(required)
The output option specifies the location to which the selected formatted content will be saved too.
./databases/Pixi[database] (required)
This option selects the database you want to use for the analysis.
./queries/javascript/ql/src/Security/CWE-079/ReflectedXss.ql[query] (required)
The final option selects the Query, Query Suite or directory you want to use to analysis the results with. In this example, I’m selecting a single query from the CodeQL JavaScript Core Query Pack.
Typically when analysis an application, you would want to select multiple queries (SQL Injection, Command Injection, XSS, etc.). This is called a Query Suite, and you can select some of the predefined Query Suite’s from the GitHub CodeQL queries repo. An example of this would be using the following:
./queries/javascript/ql/src/codeql-suites/javascript-security-and-quality.qls
This Query Pack, for example, will run the full collection of security and quality rules build by the GitHub team and the community of security researchers.
Analysis Output
Once the queries have executed (this can take from a few seconds to minutes) you should have some results like the example output below (ran in PowerShell).
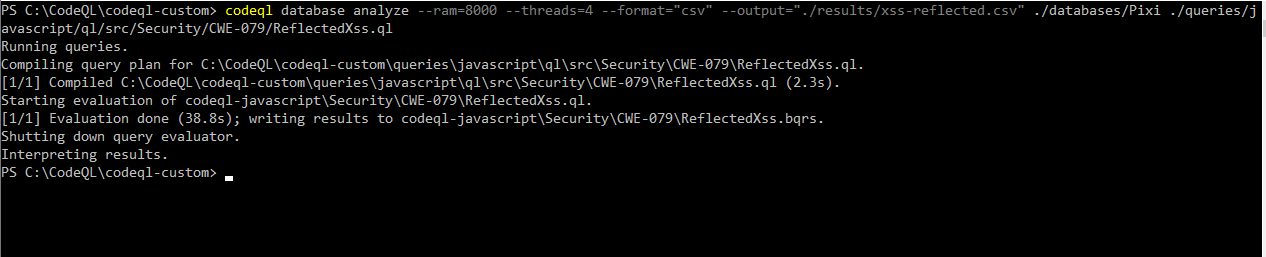
You’ll notice that the query starts compiling which takes into account all queries that the selected query depends on. This will include things like lists of Sources and Sinks that the GitHub Advance security team and members of the community have created. Thankfully because we have run this command once when you rerun, it’s almost instant.
Once the query has compiled and evaluated the queries, the resulting file is produced. In our case a CSV file with a resulting Sinks where the issues occur.

From the example shown above, you can see six different Cross-Site Script security issues reported by CodeQL. If you navigate to the corresponding file and line numbers, you will find that the user input is rendered back to the user without any encoding being performed. Column five is which file the Sink occurs in, column six is where the Source of the user input comes into the application, and column eight is where the Sink occurs.
This is a great format just to see some results quickly, but it does lack some of the full flow paths typical security researching need to understand the exact path from Source to sink; This is where SARIF comes in.
The SARIF or Static Analysis Results Interchange Format format is an open-source format which was developed to standardise the output of static code analysis tools.
This structured JSON generates full execution paths for users to follow and all the details you could need for verifying the results.
All you need to do it update the analysis command’s format argument to sarif-latest and point it to the correct output file.
# Analysis the project using a Reflective Cross-Side Scripting
codeql database analyze \
  --ram=8000 --threads=4 \
  --format="sarif-latest" \
  --output="./results/xss-reflected.sarif.json" \
  ./databases/Pixi \
  ./queries/javascript/ql/src/Security/CWE-079/ReflectedXss.ql
Here the is output of the command that produces the SARIF/JSON file.

The JSON file that is produced contains a lot of content. The first thing you’ll notice in the file contains details about the particular tool that generates the output. This allows you to create a single file with a number tool in the same output.
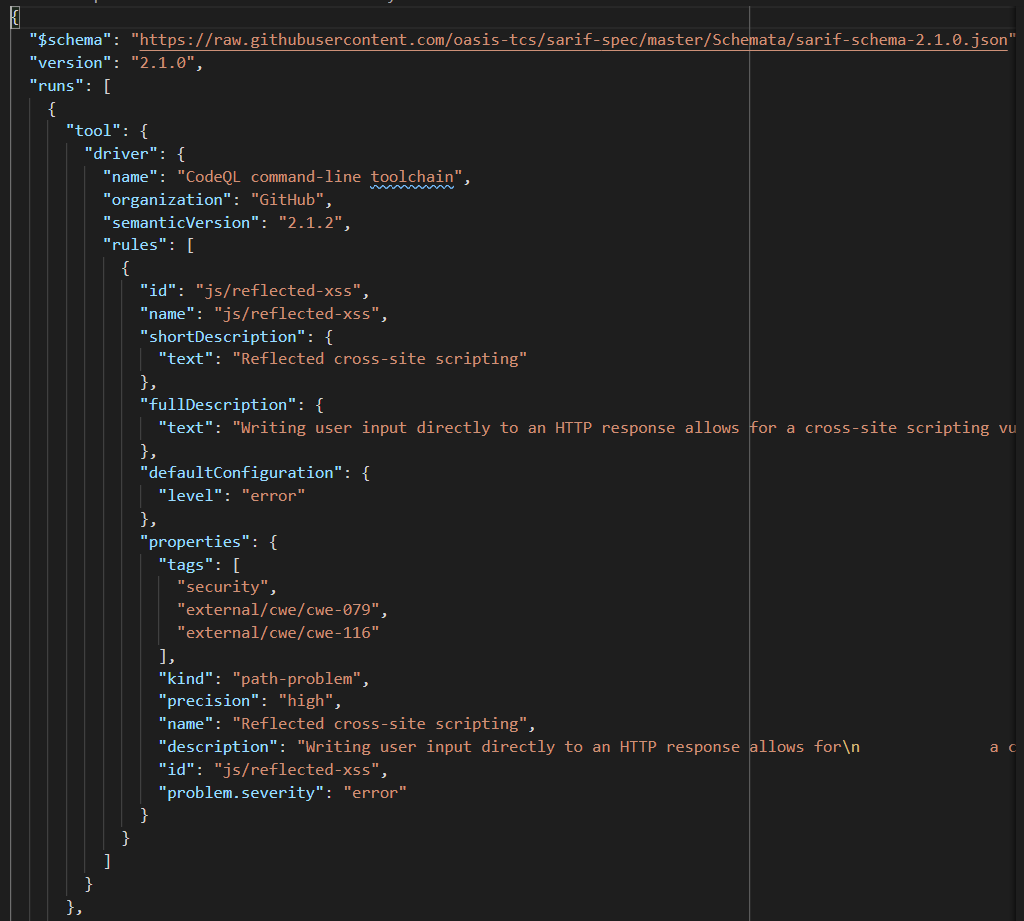
After all the tool details, the main attraction of the file can be found in the codeFlows section.
Here is where you can find all the details around each security issue flows from Source (where the user input comes into the application) to the Sink (where the issue occurs).

You can see above each location in the flow.
The Source (the first element in the locations array) shows that the location of the Source:
File: app/server.js, Line number #218, column 58.
The second location is the location of the Sink, where the vulnerability occurs. In this case, when the user-supplied content is rendered back to the user.
File: app/server.js, Line number #218, , column 26.
This example of vulnerability has a is a very simple flow between only two nodes on the same line, but in a lot of cases, these flows are longer and more complex.
There we are, go forth and be awesome with your newly acquired CodeQL skills 😄.
Conclusion
In this blog post, we covered several different topics that hopefully you have learnt and taken away to help you know more about CodeQL.
The first sections was primarily focused on understanding what CodeQL, how generally it works, and how to set up your local environment to get started. We finally finished off with understanding how to create a CodeQL Database and how to run queries on that database to get ourselves results.
Hopefully, you all learnt something from this post, and if you want more content focused on CodeQL or Static Code Analysis in general, please let me know below or on Twitter @geekmasher.
References
- Semmle Website
- Welcoming Semmle to GitHub
- GitHub - Securing software, together
- CodeQL
- Learning CodedQL
- CodeQL for JavaScript
- CodeQL CLI
- GitHub - CodeQL CLI Download
- Visual Studio Code plugin
- GitHub - CodeQL Queries
- GitHub - CodeQL GoLang Queries
- Query Suites
- GitHub - Query Suites - JavaScript
- Creating CodeQL databases
- CodeQL Docs - Database Create
- CodeQL Docs - Database Analysis
- GitHub - GitHub Satellite 2020 Workshop - CodeQL for Java/JavaScript
- GitHub - Starter workspace to use with the CodeQL extension for Visual Studio Code.
- LGTM Website
- GitHub - DevSlop Pixi
- Wikipedia - Lexical Analysis Tokenization
- Wikipedia - Abstract syntax tree
- Wikipedia - Control-flow graph
- Wikipedia - Data-flow analysis
- Wikipedia - Static application security testing
- GitHub - OWASP WebGoat
- OWASP Cross Site Scripting (XSS)
- YouTube - Finding security vulnerabilities in Java with CodeQL - GitHub Satellite 2020
- YouTube - Finding security vulnerabilities in JavaScript with CodeQL - GitHub Satellite 2020
- GitHub - SARIF Spec Repo